Table des matières
If you have installed Xubuntu alongside another OS (Operating System), also known as dual booting, then you will be presented with the GRUB boot menu when you turn on your computer. This menu gives you options to start Xubuntu, start Xubuntu with advanced options, run a memory test or start other OSes. You may press the Escape key before booting to access the GRUB menu if you are not on a dual boot system.
Once the booting process begins, you will see the Xubuntu splash screen with a circular animation.

![[Note]](../../libs-common/images/note.png)
|
|
|
If you would like to customize the look and behaviour of the GRUB boot menu, you can install Grub Customizer ( |
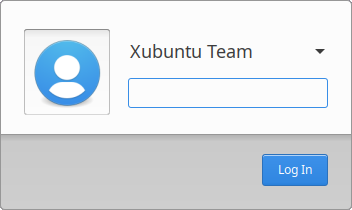
When the booting process is complete, the login screen appears. It contains a panel at the top and a login dialog in the center of the screen. From left to right, the panel contains the computer name, the session selector, locale/language selector, accessibility options selector, date & time, and log out options.

The login dialog allows you to select an account name and type in the password to log into that session. You will not see the login screen if you selected the Log in automatically option on the Who are you? screen of the installer.

![[Note]](../../libs-common/images/note.png)
|
|
|
To enable or disable automatic login of a user account, open Users and Groups, found in the or Settings Manager, select the account in the list on the left, click the button on the Password line and check or uncheck the Don’t ask for password on login checkbox. To configure the appearance of the login screen, open LightDM GTK+ Greeter settings. |
Similar to the login screen, the default Xubuntu desktop has a single panel located at the top of the screen, along with a wallpaper and desktop icons.

The panel is used for launching and switching applications as well as providing easy access to interactive system status indicators in order to see and change the status of important components of your system.

On the left side of the panel you will find the button, which has the icon of the Xubuntu logo. Next to that is the list of running applications with available windows, known as the window list or taskbar buttons.
On the right of the panel is the Notification Area, which contains indicators showing status information, like network connectivity and sound volume level. The first indicator on the far right is the clock, which displays the system date and time. Clicking on the clock displays the calendar. Some indicator icons appear and disappear based on context. The bluetooth icon, for example, will appear when a bluetooth adapter is present. The notification area also hosts system tray icons of running applications that support this feature, such as Transmission or Audacious.
![[Note]](../../libs-common/images/note.png)
|
|
|
The location of the panel and its components along with various options can be customized by right-clicking on the panel and selecting → . |

Clicking the button on the panel or pressing the Ctrl+Escape keyboard shortcut will open the menu, which has five (5) sections:
A search field to filter installed applications.
A column listing application categories.
A list of applications in the selected category. Favorites is selected and displayed by default.
The user account’s name and photograph.
Command buttons for the Settings Manager, locking the screen and the log out dialog.
![[Note]](../../libs-common/images/note.png)
|
|
|
To customize the appearance and behaviour of the , right-click the menu icon and select Properties. To customize which applications appear in the menu and their properties (icon, text, command), right-click the menu icon and select Edit Applications or open Menu Editor. |
The default desktop has three primary icons -- Home, File System and Trash -- as well as icons for partitions and removable devices, if they are present. Additional files, folders, application launchers and website shortcuts can be added to the desktop and can be manually or automatically arranged. You can set the desktop wallpaper and which desktop icons are visible, as well as their options, by right-clicking in a blank area of the desktop and choosing Desktop Settings from the context menu.
Xubuntu provides a collection of commands for managing your session. These commands are accessible from the command buttons section of the as well as through shortcut keys.
The first of the these commands is the button, which locks the current session and presents the login dialog to resume the session. Locking the screen is also accessible by two keyboard shortcuts: Super+L and Ctrl+Alt+L.

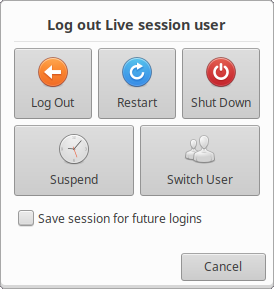
The remaining session commands are accessible through the button, as well as the Ctrl+Alt+Delete keyboard shortcuts, which opens a dialog and gives access to commands to:
Log Out - End the current session.
Restart - Restart the computer.
Shutdown - Shut down the computer.
Suspend - Put the computer to sleep and have it run with minimal power.
Hibernate - Save the current desktop session and shut down the computer. When you restart the computer, you will resume the session.
Switch User - Log in to another user account.
![[Note]](../../libs-common/images/note.png)
|
|
|
It is possible to access the session management commands from the panel by right-clicking on the panel and then → and then adding the Action Buttons entry. It is also possible to add additional session management commands to the by right-clicking the Menu icon and selecting Properties and then enabling them in the Commands tab. |
![[Note]](../../libs-common/images/note.png)
|
|
|
Hibernation is disabled by default in Xubuntu and instructions to enable it can be found in Activation de l'hibernation. |