Table des matières
Whether you are connected to a computer on your home’s LAN (Local Area Network) or a computer kilometers away on the Internet, the status of your network connection is always visible to you in the notification area of the panel. Network customization settings are available in the Advanced Network Configuration settings dialog, which is accessible from the Hardware category of the  , the Settings category of the
 ![]() (Ctrl + Escape), and in the Application Finder (Alt + F3).
(Ctrl + Escape), and in the Application Finder (Alt + F3).
When there is no access to the network, either because networking has been disabled or a connection to the network hasn’t been established, a disconnected icon will appear on the panel to indicate this status. When you are connected, the icon will vary depending on which connection type the network is using.
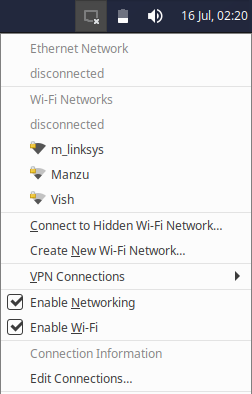
Clicking on the icon will open a menu that displays the connectivity status to the Ethernet and Wi-Fi networks, as well as listing any Wi-Fi networks that are in range. If you are connecting using a wired ethernet cable, it will connect automatically, whereas if you select a Wi-Fi network in the menu that wasn’t previously connected, a dialog box may open if a password is needed.
The Connect to Hidden Wi-Fi Network... menu entry will allow you to connect to a Wi-Fi network that is hiding its network name by entering the network name and, if required, the password. The Create New Wi-Fi Network... menu entry will allow you to create a new wireless hotspot from your computer. The entry will open a dialog where you can set the network name, security method and key to be used.
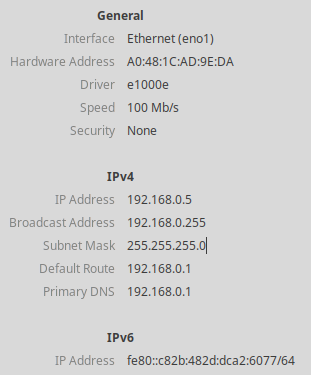
Selecting the Connection Information menu item will open a dialog that displays information about the connection devices, including their MAC addresses, drivers, and speed, as well as IP address information in both IPv4 and IPv6. Selecting the Edit Connections... menu entry will open the network configuration dialog.
To disconnect from a network, select the Disconnect menu entry under the appropriate connection type. Enabling and disabling the wired and wireless connections is possible by selecting the Enable Networking or Enable Wi-Fi checkboxes. Enable Networking will enable or disable all wired and wireless connections, while Enable Wi-Fi is limited to enabling or disabling wireless connections.
To make configuration changes to network connections, select the Edit Connections... entry in the applet’s menu or open the Advanced Network Configuration settings dialog through the ![]() , Application Finder, or .
, Application Finder, or .
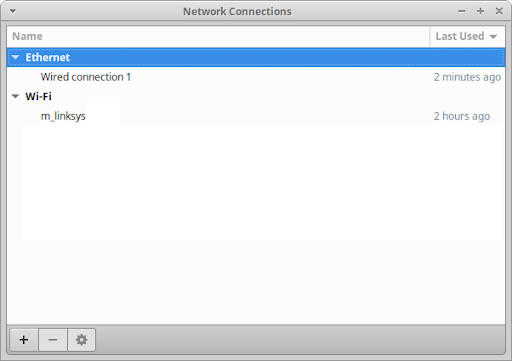
The dialog lists existing network connections categorized by connection type. The bottom of the dialog has buttons to add and remove network connections or edit the selected network connection. When editing a network connection, you can set features such as the connection’s name, whether it should use a VPN, MAC address clone, security options, proxy options, IP address options, and DNS servers.
If you click the Add a new connection button at the bottom of the dialog, a dialog will appear asking you to select the connection type. The connection type list includes hardware types, such as DSL and Mobile Broadband, virtual types, such as Bond and Bridge, and VPN (Virtual Private Network) types. If the VPN connection type you wish to create isn’t listed, you will need to install its plugin, with OpenVPN (![]() network-manager-openvpn-gnome
network-manager-openvpn-gnome![]() wireguard
wireguard![]() network-manager-openconnect-gnome
network-manager-openconnect-gnome
![[Note]](../../libs-common/images/note.png)
|
|
|
Unfortunately, dialup modems are not supported by the NetworkManager. To read about connecting with a dialup modem, please refer to the Ubuntu community wiki’s Dialup modem How-to. |
If you are connected to a network connection by Ethernet cable or by cellular and have a Wireless adapter connected to your computer or laptop, you can share your connection with another computer. To set up the wifi hotspot, the simple method is to select the Create New Wi-Fi Network... menu entry through the panel applet. Alternatively open the Network Connections settings dialog and either add or modify a Wi-Fi connection. In the connection properties dialog, switch to the IPv4 Settings tab and change to Shared to other computers from the drop-down list.
Bluetooth is a popular wireless technology that allows us to easily pair our computers, mobile phones, and tablets to input and output peripherals, like headsets, speakers, mice, keyboards, and printers. If a bluetooth adapter is connected to your computer, a bluetooth applet will appear in the notification area of the panel. If the bluetooth icon is dimmed, then the bluetooth adapter is disabled and hovering the mouse over the icon will also show this status in the tooltip. Clicking the icon will display a menu with action options, such as changing the adapter’s status and sending a file to a device, as well as configuration options, such as adapter and device settings.
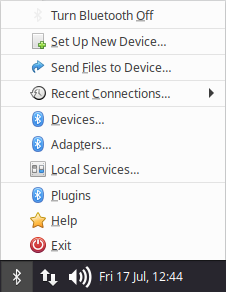
The top menu item will allow you to enable or disable the bluetooth adapter depending on its current status. The Set Up New Device... menu item will open a wizard dialog to assist you in connecting your new bluetooth device. The Adapters... menu entry will open a dialog where you can set the adapter’s visibility and broadcast name. The Devices... menu entry will open the Bluetooth Manager settings dialog, which is also accessible through the ![]() , Application Finder, or .
, Application Finder, or .
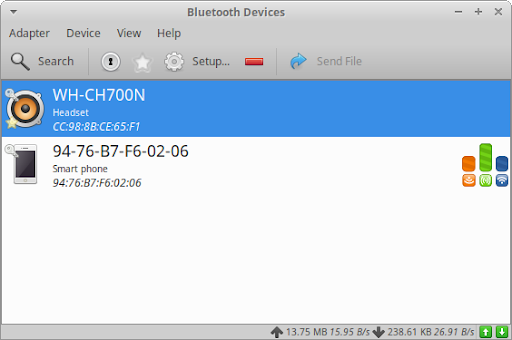
The settings dialog will list all of the bluetooth devices that have been connected to your computer. To connect to new devices, click the Search button and visible devices will appear in the list. Select the new device and either pair or connect to it through the Pair button in the toolbar or the items in the right-click context menu. Additional options to rename, trust, remove, or send a file to a device can be found in the toolbar or context menu. To make changes to the adapter settings, open the Adapter menu and select Preferences.
To connect to various types of servers, you can use ![]() → → . To connect to a server, follow the steps below:
→ → . To connect to a server, follow the steps below:
Go to →
Sélectionnez le Type de service approprié et insérez les informations de connexion
Cliquez sur ; si vous cherchez à vous connecter à un serveur qui demande une authentification, vous serez invité à saisir un mot de passe
Upon successfully connecting to the server, an icon labeled with connection details will appear in the Gigolo window. To bookmark connections, right-click on a connection and select Create Bookmark. In the Edit Bookmarks dialog, you can name the bookmark and set other options, including the option to auto-connect. Once you are done, click to create the bookmark.
|
|
|
|
The Windows Share username should be in the format |
|
|
|
|
In order to connect to Samba networks (Windows shares) using the Thunar File Manager, you will need to have the package |
 |
 |
|
| Chapitre 7. Settings - Hardware |

|
Chapitre 9. Impression et numérisation |